
Hello! It’s been a while. After my furious burst of sewing a few weeks ago, the pace has dropped off as I’ve been knee-deep in wallpapering, painting and furniture rearranging territory (as you may have seen on Instagram with my lemur wallcovering. I love it.). Anyway, I have been doing some sewing; just not much photo-taking or writing. So I’ll get to it and dive right in with this latest make and my first proper button-up blouse.

The Colette Aster has been around since 2015 and there are a ton of reviews on the web. I perused a good number of them and took some notes: the sleeves being hard to set in was a common complaint, as was the trickiness of putting the placket/neckline together (spoiler: I concur in both cases). Nevertheless, I’ve admired the Aster for a while and kicked myself when I saw it on so many #makenine lists this year. Recently, I felt a hankering to get it made up, so I bit the bullet and went for it.

There are three different views for Aster, all with the distinctive V-shaped neckline and inverted pleat in the back. Since it’s still warm in these parts, I decided to make View 1, the short-sleeved version. The blouse comes in sizes 0-26 and I made a 14, which is my standard Colette size and usually works pretty well. Having said that, I had already merrily traced the pattern and cut out the fabric pieces before it occurred to me that I might need a FBA for this blouse. Now that it’s finished I can see there a few small draglines around that area and I have a very annoying small gap halfway down the blouse. You know, the one women with boobs are always trying to avoid. Urgh. It would have served me well to make an adjustment of an inch or two (although I did also misplace one of the closures), but for now, a pin helps out.

As fabric goes, I raked through my stash and came up with this lovely piece of red rayon that I purchased in Remnant Kings in Glasgow last year on holiday. Red and I are normally pretty good mates and I really like the shade too. I’m not usually a small print girl, but I think it works well for this kind of blouse. It wasn’t even too much of a bugger to cut and only slightly slippy to sew with. Win!

I made a number of small errors making this blouse and they were mostly to do with finishing. To construct, I used both the pattern instructions and also the Aster tutorial from Colette’s website and between them managed to figure it all out. The pieces were staystitched, interfaced and then the bust darts constructed. Two notes on this: 1) my interfacing piece was short compared to the instruction picture and 2) the bust darts were perfect – I often have to lower them by 1/2″ to 1″.

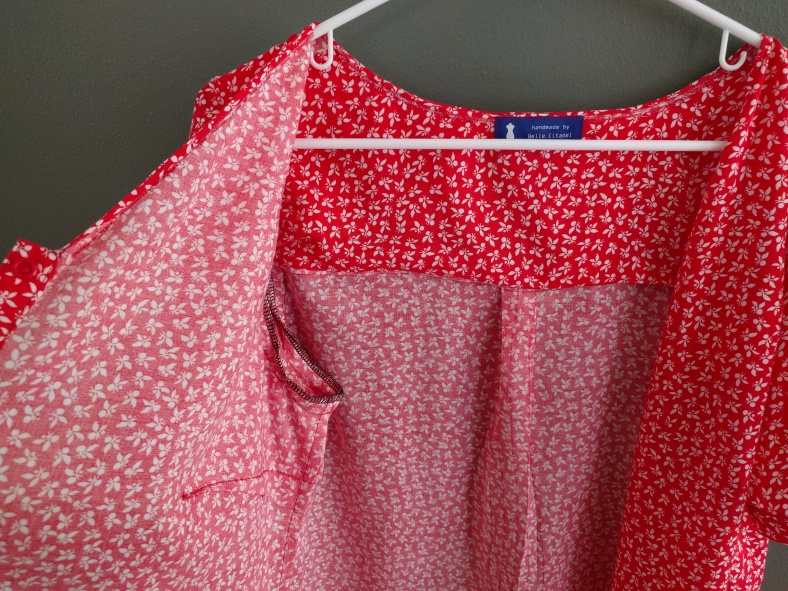
Next the pleat was formed at the back, which was very simple, but it was my first such pleat, so I was excited! Then the yoke was attached to the front and back using the burrito method, which I enjoyed just as much as I when I made the Grainline Alder shirtdress. The instructions here were good, but if you haven’t used this method before, I highly recommend the Grainline video tutorial, which I linked to in the Alder post. I tried to attach a yoke using the traditional method recently and it was horrendous by comparison.

The next stage was to sew the side seams, which I French seamed (in my head I get a bonus glass of wine or something for that) and then it was time to attach the bias tape to finish the neckline. For this pattern you need 1/4″ bias tape, which I didn’t have. On top of that, I think bought tape would have looked strange with the lightweight rayon, so I decided to make some. Because I’m a glutton for punishment, I decided to have another go at making it using the continuous method. It didn’t go well last time.

If you’re not familiar with it, this means that rather than cut out long strips on the bias and sew them all painstakingly together, you start with a square and fold it in such a way that you can cut one long strip from it. The problem is that it’s very tricky to understand what is being folded where unless someone shows you in real life. Well, I found a great tutorial from Make it & Love it, which actually worked for me! It’s very detailed and I urge you to check it out if the process stumps you too.

 Now, I was so overjoyed that the method worked that I overlooked a crucial factor in making the tape. I had thought single-fold 1/4″ tape was 1/2″ folded over once. Actually I should have made it more like an inch and folded the two sides into the centre. It meant that when I attached the tape I had a raw edge on the inside. Unfortunately, the tape was too narrow and fraying to do much about it, but it’s a little annoying. Doh!
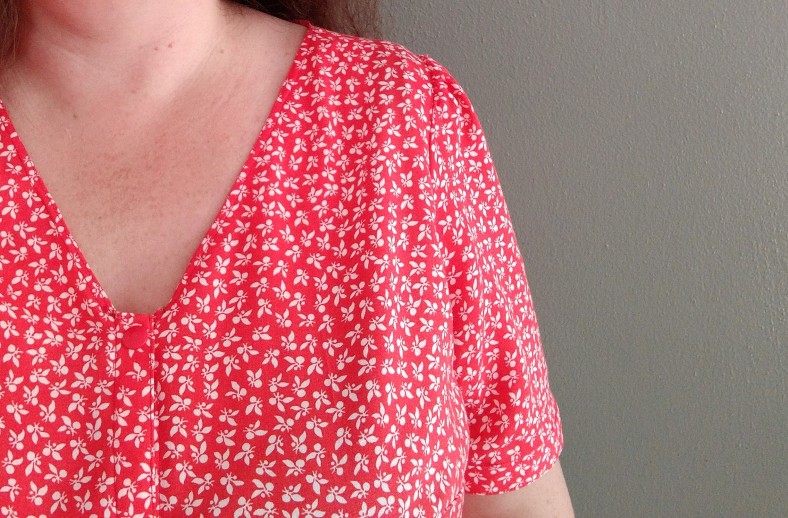
Moving onto the placket, the idea of finishing the neckline is to tuck the ends of the bias tape into the placket to tidy them and sew the placket down. This is accomplished through a slightly tricky set of instructions (I recommend the website tutorial for this part) and I’ve ended up with not a great finish. Don’t look too closely! I think I didn’t clip into the top corners far enough, so the placket didn’t reach over as far as needed. I’m sure there must be another way to achieve this that’s a bit neater, so I’ll perhaps pore over a few of my sewing books next time I come across this situation.
Ooooh, now it was time to set in the sleeves. They are gathered across the top to fit and a few other reviewers mentioned that they think the gathering doesn’t go far enough round the sleeve. I have to say I agree and would extend it on both sides next time. I’m no expert at setting in sleeves, but these gave me more trouble than others I’ve worked on. The short sleeves have an interface cuff, which provides a satifsying sturdiness and they fit me well as far as the armhole goes.

Finally, the blouse is finished by hemming and the buttons added. I do like the curved hem on the Aster, although it’s quite short at the hips. I would possibly lengthen it by an inch or two next time. I decided to forget the buttons altogether and try out KAM snaps, which I bought a few months ago for making kids clothes. I wanted to keep the overall register of the shirt red, and they just looked great against the fabric. I was quite surprised, since I thought the plastic might look a little cheap.
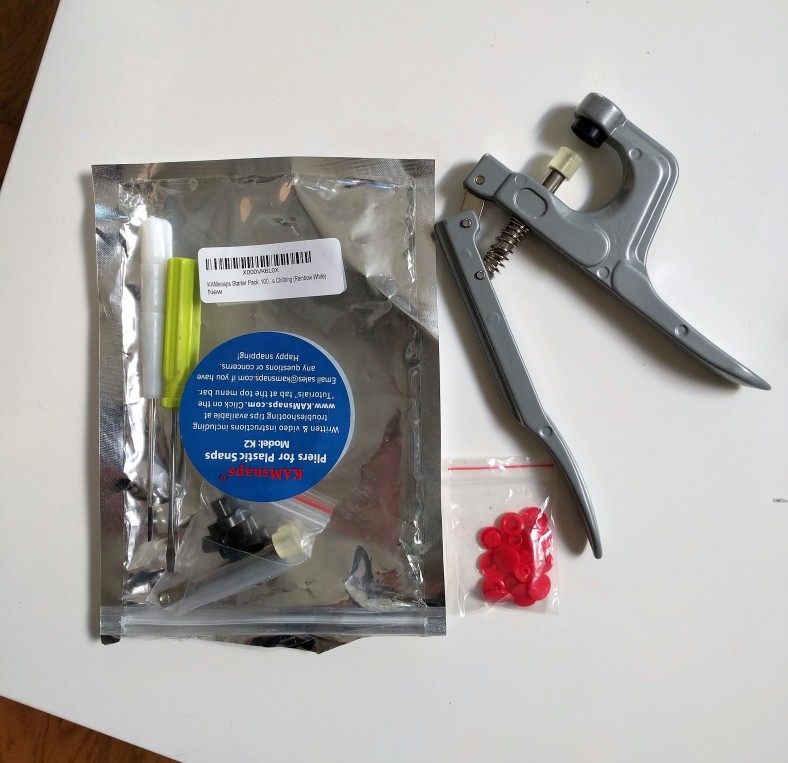
But, my word, these things are EASY and FAST to attach. It took 5 mins to do the lot, which was a definite high point of this project. KAM snaps – I love you. Speaking of love, did you notice my little blue labels? I got them from Dutch Label Company and I really like them (ok, I love them, but I’ve used that word a lot). It’s so nice to finish a garment off with a personal touch like this.

Overall then, I still really like the Aster blouse. I experienced a few little hiccups, but they haven’t put me off making another one. The long-sleeved version features gorgeous little pleats on the upper front, so I may go and try them out for autumn/winter in a chambray or something. Let’s see!

You’re a trooper, making your first button up blouse in rayon! It turned out beautifully 🙂
LikeLiked by 1 person
Ha ha, trooper is certainly one word for it! The fabric was a pretty forgiving rayon to be honest, but I was glad to avoid the buttons on this one. Thanks so much! 🙂
LikeLike
I kinda wanna steal this fabric! Looks great – looking forward to seeing your autumn version!
LikeLiked by 1 person
Thanks Jo! I wasn’t sure if it was too mumsy combined with the pattern at first, but it worked out ok. Did you watch GoT yet? Was going to text but didn’t want to spoil in case you hadn’t…
LikeLike
Yes, I did! Bit of a come down in terms of excitement from last week, but I’m enjoying Littlefinger playing Arya and Sansa against each other. I hear that this week’s is going to be great, but have so far avoided the leaks…
LikeLike
I love your blouse and I’m sure it’s a dream to wear in rayon. I just finished the FEN dress in rayon challis, making it a few inches longer than the pattern. I’m still a beginner for sewing with that fabric. You and some other bloggers are so successful with rayon; maybe I’ll be there one day if I keep trying. I enjoy your blog.
LikeLike
Thank you Jeanette – that’s so kind of you! I have to be honest, the rayon was a bit more forgiving than some and the walking foot definitely helps out! I bet your rayon it looks wonderful with the Fen dress. I tried using rayon for an Inari dress when I started sewing last year and it was a complete disaster, so you’re not alone. 😀
LikeLike
I’m slow to comment, but I have to because I love your blouse 🙂 You’re right — red is definitely your color! The minimalist look of the blouse works out really with your fabric, both thanks to color and the drape.
I’ve been eyeing the Aster pattern for a while, and your version of it is a great inspiration. I think that rather than making the Aster, I’ll hack a pattern I already have (looking at you, Helmi blouse or Burda pattern forgot-the-number-at-the-moment).
LikeLike
And I’m slow to reply! 😁 All this eclipse stuff got me sidetracked! Thanks so much; I’m chuffed to hear you like it and it makes sense to adapt one of your already-beautifully-fitting tops to make it!
What are you working on now? I’ve been having a few fitting niggles recently, but I actually think I’m just noticing the fit more! So I’m making a bag – no fitting issues there. Then… I’m not sure… there’s so much to choose from as always.
LikeLiked by 1 person
No project at the moment 😞 I’m working full-time right now and still trying to get into the rhythm of it. I hope I manage to find some time for sewing soon.
A bag! I haven’t made any but that’s a really neat project. I really like the bags you’ve made so far, so I’m looking forward to seeing the new one 😊
LikeLike