
Fig and Needle is a new indie pattern company, run by Sandra and Ping, whose aim is to create feminine clothing with inclusive sizing. I’ve met Sandra a couple of times at various Seattle sewing meetups and, although I didn’t know exactly which patterns they were developing, I knew about their two-block process and was excited to try their designs out on launch. The one I chose to make was the Faron jumper, or, as we would say in the UK, pinafore.

The Faron
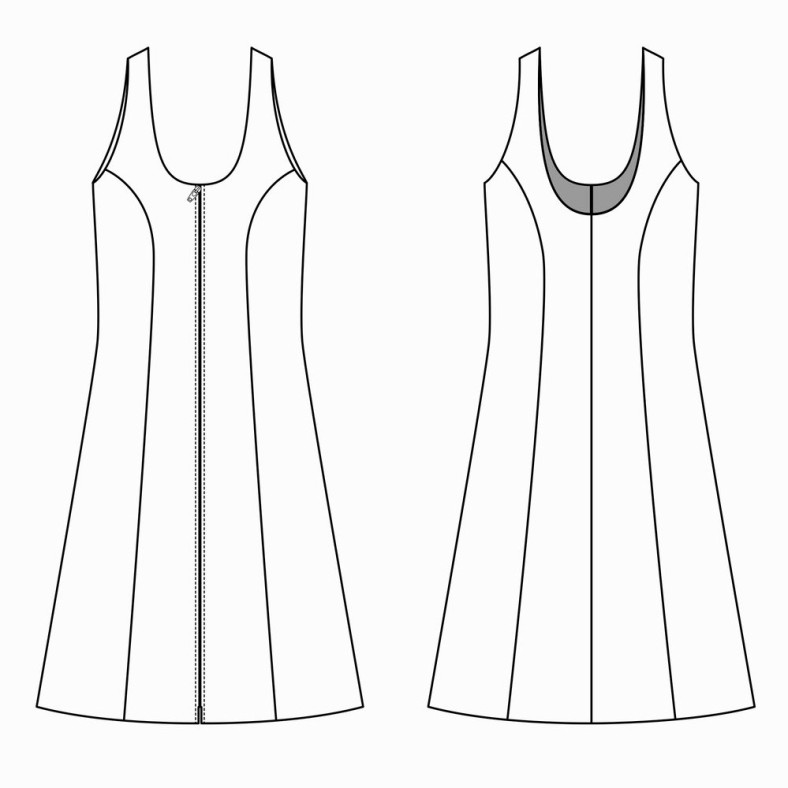
The Faron jumper is described by Fig and Needle as “a sleeveless overdress with a scooped front neckline and low back, front and back princess seams, an a-line skirt, and a separating zipper opening in the front.” Pretty accurate I’d say! The Faron is also designed to be worn over other garments, which definitely appealed to me and also comes in two size options: 0-12 (D cup) and 14-26 (DD cup), which was the clincher for me as I was really interested in trying out a larger cup dress.
As it happens I haven’t made many princess-seamed garments at all. In fact, the only proper dress I’ve made before was for a friend of mine and I’ve forgotten most of what I did, it was so long ago. I do know that princess seams are fantastic for curvy figures as you can really manipulate the seamlines to get a perfect fit. Equally, however, it’s important that you do get those lines shipshape. There is really nowhere to hide in a clean dress like this, and especially if you make it in a recommended structured fabric like corduroy, as I did.
I had a large amount of the sky blue corduroy, which I purchased from Our Fabric Stash, our local fabric consignment store, so I decided to go ahead and make a muslin from it too. I don’t think using regular muslin fabric would have been super helpful, given the difference in fabric thickness. Thank goodness I had about 4 yards as I ended up making a couple of versions.
Fitting adjustments
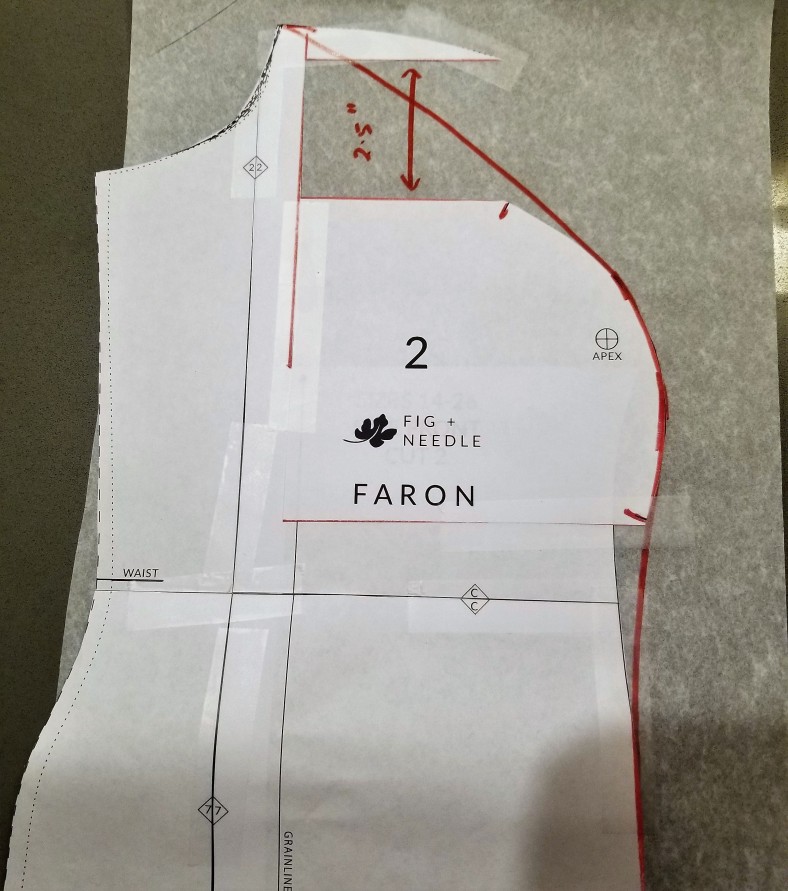
On making the muslin, the first very obvious factor was that my own bust apex was way off the pattern bust apex. I do have to lower bust darts by an inch or so on a not-infrequent basis, but this baby was a full 2.5 inches too high. I wonder somewhat if many DD+ busted ladies have nipples so far north of their bellybutton, but, hey, maybe it’s just me? I could have fixed that issue right away if I’d remembered to measure myself against the pattern piece as the apex is clearly marked – but I didn’t. Ah well – I guess that’s what the muslin is for, eh?

I had no idea how to lower an apex when it comes to princess seams, so I did a little research and came up with this Curvy Sewing Collective tutorial, which was very helpful.
I dutifully followed the instructions and made my best guess at where the lines should be trued and filled in. I think it worked okay, but I’ll probably have a look at some other sources to compare when I have time. I also redrafted the front facing to match my newly-adjusted front, so don’t forget to check those too, after making any adjustments yourself.

Another fitting issue I came across was that the shoulder seam was forward on my garment – that is, closer to my bust than back. I must say the shoulder seam is not something I usually have to tinker with as it normally sits fairly centrally for me. If anything, I would expect that I might need a forward shoulder adjustment, given my years of office work and “mom” posture. You can see there’s a lot of gaping around the armhole too.

I wonder if there’s a forward shoulder adjustment built in, but in any case I pinned out a wedge graded from around 3/8 inch at the inner neckline to about an inch at the upper armhole. This also got rid of some of the excess fabric – I presumed you needed some for the facing seam allowance.


My final adjustment was to take the side seams in a bit. I sewed the armhole to the underbust side seam at 3/4-inch and the rest at an inch seam allowance. The regular seam allowance is 5/8-inch. I just felt it was a little loose and sack-like in this thick corduroy and there was a fair bit of ease to play with. The resulting dress still has plenty of room to move about in and I think still retains the “outer garment” feel.
Construction
I made a few mistakes constructing this dress and most of them were a little dumb. The instructions are good and it shouldn’t take very long to put the jumper together. It definitely took me longer than it should have, but this was also down to my really trying to get a good fit. One thing I will say is that my dress was quite a bit longer than the recommended 24-26″ zipper. I did use a 26″ zipper in the end, but probably could have used a 28-30″ zipper – I just couldn’t find any nice ones. So do measure your garment before choosing a zipper.

Otherwise, I’m just going to list a few hints and “don’t do what I did” tips:
-
- If you finish your edges in advance (and I do prefer this approach as suggested in the instructions), remember the finished edges will probably obliterate your notches. And if there’s one thing I know about princess seams, it’s that you absolutely 126% need your notches. I’m happy to cut corners with the best of them – but miss these notches and you will enter a world of PAIN. Worse than running out of bobbin thread right before the end of your seam-pain.
- Speaking of finishing, remember to finish the bottom of your facing before you sew the facing on.

-
- Make sure you use a separating zip or be prepared to fiddle. This is mentioned in the requirements, but the most suitable one I found wasn’t separating, so when I pulled the facing through to the right side, through the armhole tube, I had to take the zipper off on one side. A separating zipper would avoid that problem, obviously.
- For pulling the sides through the aforementioned shoulder facing, I found it easiest to roll the bottom of the front piece into a tightish tube and then poke it as far up as I could on one side of the facing. I could then grasp it from the other side (it’s a tight fit) and ease it out. It only took a few seconds once I figured this out.

- DO understitch the facing as advised. It makes a huge difference when trying to avoid the facing rolling out to the right side. It’s definitely worth it.
Adjustments for next time
I took my time on fitting this garment for two reasons. Firstly, it’s something I could see making again. It layers very well with other garments and is comfortable, but still fairly feminine. Secondly, because it’s a simple silhouette in a fairly unforgiving fabric, there’s nowhere to hide. A badly fitting jumper will be a very obviously badly fitting jumper.
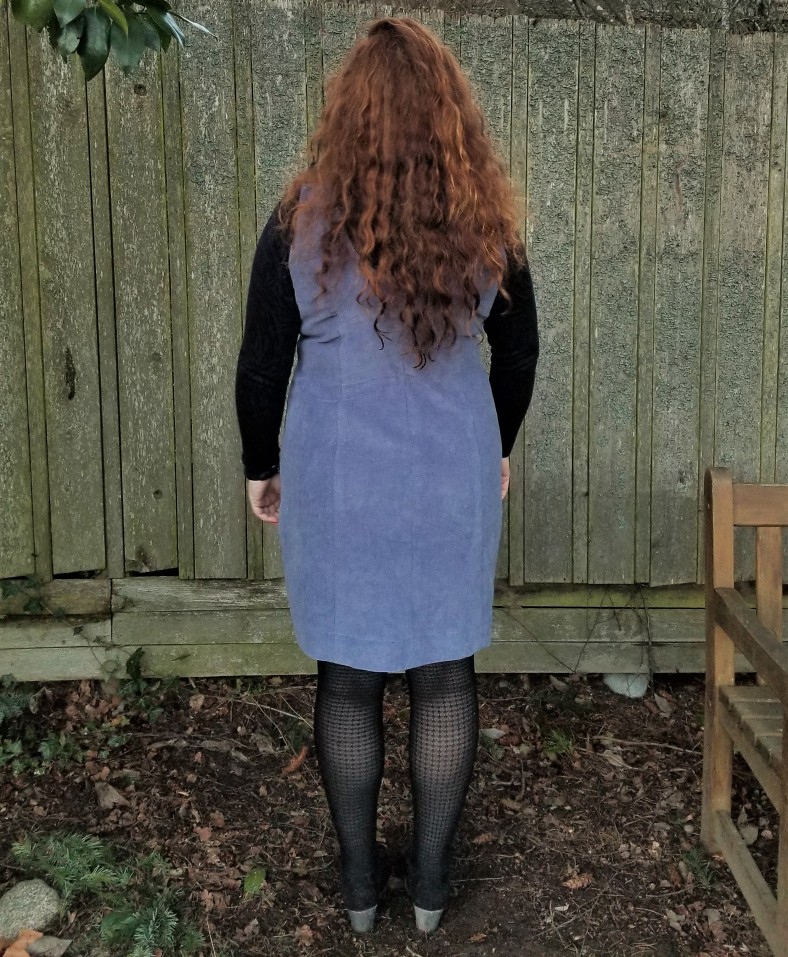
I am pretty happy with the fit, but still have a few areas to work on. The back has a few extra wrinkles and diagonal pulls. I noticed some of the tester versions were similar and will try to look into how to address that.

I was pleased with the lowered bust apex, but next time I will also slightly move the bust apex towards the outer seams by around 1/4 to 1/2 inch. I have a few wrinkles on the princess seam line, which I read would disappear after clipping the seams. Hmm – they didn’t quite disappear for me and I tried my best to steam them too, but I would like to try and get rid of those. I thought it was just dodgy sewing, but I’ve again noticed a few corduroy versions had this issue, so perhaps that has something to do with it.

I had a little trouble with my redrafted facings as I didn’t quite make them long enough at centre front. I finished them as instructed, but it looked a little messy, so I ended up turning them and topstitching. Much neater from the outside (just don’t look too closely inside) and I was much happier afterwards.

Conclusion
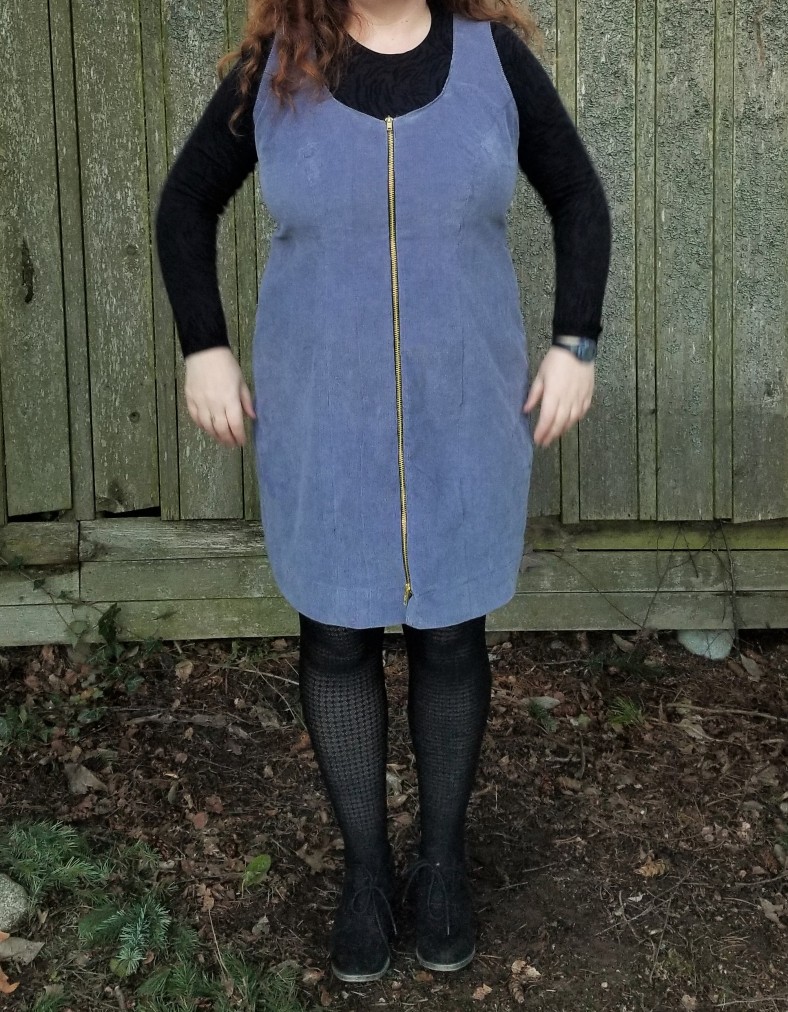
I’m really happy that I spent the time fiddling with this pattern. There were several moments when I thought, aw man, this is going to look TERRIBLE. Not because of the pattern, but just the style on ME. But you know what? I think I just about pulled it off, which, I’m not going to lie, is a nice feeling. I also learnt a lot about princess seams and ended up with a great multi-seasonal garment in one of my favourite colours. I’m really looking forward to seeing what Fig and Needle come up with next!

That’s a great dress/ jumper! Well done on the fitting too 👍 I’ve been trying to get a better fit recently… with mixed results 😅😂👍🙏👏
LikeLiked by 1 person
Thanks Andrew! I’ve always thought you looked like you get a great fit already to be honest! What are you working on? I bookmarked your spiderweb ( was it spiderweb? lol) post to read, so maybe you wrote it in there! I’m just about to start the Seamwork Eugene Henley shirt for Tom – have you made that one before?
LikeLiked by 1 person
Hi Claire, thanks, yes everything usually fits pretty well, but sometimes I think more through chance than skill! – I’d like to ‘understand’ fit a bit better I guess?!
I’ve got a new shirt up with the spiderweb paper, but I’m not sure what’s next… maybe another shirt, or jeans… or wool flannel trousers…? It could go either way! 😂👍
I’ll look forward to seeing your Henley, I haven’t made one yet 🤞👍
LikeLike
Well worth the effort and the miles of corduroy – the fit looks really good!
LikeLiked by 1 person
Aw, thanks Lisa! I think it was worth it too! There were definitely a couple of uh-oh moments when I looked in the mirror, haha.
LikeLike
Great fit and definitely worth taking the time over adjustments. Also, I see a smoothly inserted zip, no waviness or rippling there. This dress would also be nice in denim or linen too?
LikeLiked by 1 person
Thanks you so much! I totally agree on the denim/linen. Sandra from Fig and Needle just posted a picture of an adapted dress she made in a rayon too, which looks beautiful! https://figandneedle.com/blog/2/21/faron-hack-side-zip I have the perfect piece of denim and am definitely thinking about another version. Thank you for noticing the zip too – I think the heavyweight nature of it helped avoid those dreaded ripples 😉
LikeLiked by 1 person
Thanks for your super informative post! I hate fitting princess seams and your link to the CSC tutorial is great. Also, since I’m local the Pike Place stash store is a new excellent resource as well. And your final result of a cool purple “jumper” (as my Mom would say) is well worth all of your efforts.
LikeLiked by 1 person
You’re very welcome! I hope it’s of some help – I always look for other reviews before I make something too. 🙂 What do you hate about fitting princess seams? As I say, I haven’t done it much, so am definitely interested to hear other experiences.
Are you in Seattle city itself? The consignment store is great and Deborah, who runs it, is a lovely person. Did you hear about Pacific Fabrics Northgate closing? Such a shame. 😦
LikeLike
I like/need seams for their structure on my body. Fit and flare and princess seams really flatter. BUT those princess seams can sure be too tight and too loose at the same time! Toile after toile after toile. Hopefully next time will be better. (I should just pinch and pin).
Yes I’m sad about Pacific Fabrics downsizing again. I really try to buy at the Sodo store before shopping online.
LikeLike
That is really well done! I appreciate that you shared your entire fitting and sewing process — it’s so helpful and informative!
LikeLiked by 1 person
Thanks Matti – I’m glad you find it helpful! It’s hard to know if it really is sometimes, or if watching paint dry would be more interesting! 😀 It’s horses for courses a little I suspect, although I personally do like reading both really detailed reviews as well as shorter, more visual posts. I always think, if nothing else, it’s a great record for me when I go to make it another time. I’d like to think I could remember the details, but I can barely remember what I had for lunch today, so I have to be realistic…
LikeLiked by 1 person
I enjoyed reading your review at PR and popped over to see more on your blog. Glad I did. This is a nice jumper/overdress/pinafore. I really like it. There is another indie pattern that has a pinafore that I have been considering. I have to admit I like the princess seams and the front zipper. This is a style I normally do not wear, but my lifestyle has changed and this look is growing on me. The fit of this on you looks great. Thanks for reviewing this.
LikeLike
Nicely done! You did a lot of fitting on that one, but it was really really worthwhile! I love that style of dress with some tights in the cooler months. All those layers keep me warm!
LikeLike
That is really cute and I love the zipper up the front and the princess seams. It looks like it fits perfectly and that fabric is wonderful – – such a great make, so worth the time and effort to get it to fit just right!
LikeLiked by 1 person
Thanks very much! 🙂 I think it’s the zipper that really stood out to me too, when I saw the pattern. I’m glad I took the time to fit it – I think it’s a perfect multi-seasonal garment!
LikeLike